最近有一个新项目,因为没有历史负担,整哈上手了最新的springboot3.x体系,所以就顺带也升级了spring6.x。
在使用spring6.x时,发现spring官方提供了一套HTTP Interface的功能 挺好用,类似@FeignClient的那样,也可以通过@HttpExchange注解来调用第三方接口,从此可以摆脱RestTemplate臃肿的调用,实现轻量级的第三方接口服务了。
所以特此记录,与大家分享一下。
1. 版本
springboot3.3.5
spring-framework 6.1.14
jdk 17 (spring6.x 最低jdk版本)
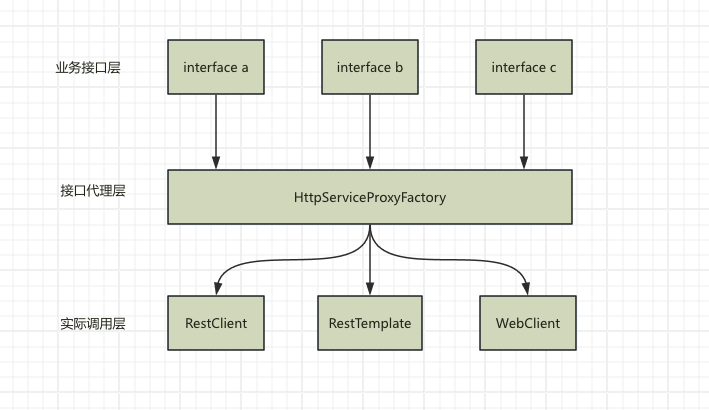
2. 原理 其实,从架构上来说,spring框架并没有对外接口调用的底层做太多的改变,HTTP Interface 是在原先的RestTemplate这类http客户端的上面,又搞了一个接口代理层,HTTP Interface的接口定义部分,然后通过代理层的代理,将http 请求功能转发到底层的http客户端实现。而这底层的http客户端实现,就是我们之前使用过的RestTemplate,以及spring6.x 新提供的RestClient。
通过上面的架构图,我们可以看出,HTTP Interface并不是响应式web(webFlux)独有的,而是可以通过自由的组合底层的http客户端实现, 来支持不同的场景,也就是说servlet阻塞式web也支持。
再次印证了技术圈的那句老话:
没有问题不是通过加一层不能解决,如果不行,那就再加一层
2.1 RestClient 多说一句RestClient,大家可能对RestTemplate和WebClient很熟悉了,一个数阻塞式web请求常青树,一个是响应式web请求客户端。RestTemplate 相对于 WebClient 来说太难用了,语法繁琐,解析不变。 所以spring6.1版本 引入了RestClient这一实现。
安装官方的解释:
The RestClient offers a more modern API for synchronous HTTP access. RestTemplate uses the same HTTP library abstraction as RestClient.
RestClient的使用demo:
1
2
3
4
5
6
int id = 1 ;Pet pet = restClient.get()"https://petclinic.example.com/pets/{id}" , id)
是不是很简洁,现代的很多http客户端都是这种流式调用语法糖,比如okhttp、java原生的HTTPClient等
2.2 HttpExchange HTTP Interface的核心注解,可以放到一个java接口类上,也可以放到一个接口方法上。通feign一样,可以同步使用spring-web体系下的相关的注解,比如@PathVariable、@RequestParam等,@HttpExchange注解标记的接口或方法上使用。
在方法上使用:
1
2
3
4
5
6
7
8
interface RepositoryService {@GetExchange("/repos/{owner}/{repo}") getRepository (@PathVariable String owner, @PathVariable String repo) ;
在类上使用:
1
2
3
4
5
6
7
8
9
10
11
@HttpExchange(url = "/repos/{owner}/{repo}", accept = "application/vnd.github.v3+json") interface RepositoryService {@GetExchange getRepository (@PathVariable String owner, @PathVariable String repo) ;@PatchExchange(contentType = MediaType.APPLICATION_FORM_URLENCODED_VALUE) void updateRepository (@PathVariable String owner, @PathVariable String repo, @RequestParam String name, @RequestParam String description, @RequestParam String homepage) ;
看到这里,大家会有一个疑问, 第三方调研的域名地址在哪里配置呢?
在feign里,我们在@FeignClient注解里,可以通过url属性来指定域名地址,但是HTTP Interface不行,需要在接口对应的代理bean里配置对应的域名地址,这里不如feign好用。
我们上面配置的接口RepositoryService必须手动注册到HttpServiceProxyFactory里才生效,不然无法使用。
在这里,我们可以自己指定底层实际的http客户端。
1
2
3
4
5
6
7
8
9
@Bean public RepositoryService repositoryService () {RestClient restClient = RestClient.builder().baseUrl("https://api.github.com/" ).build();RestClientAdapter adapter = RestClientAdapter.create(restClient);HttpServiceProxyFactory factory = HttpServiceProxyFactory.builderFor(adapter).build();RepositoryService service = factory.createClient(RepositoryService.class);
1
2
3
4
5
6
7
8
@Bean public RepositoryService repositoryService () {WebClient webClient = WebClient.builder().baseUrl("https://api.github.com/" ).build();WebClientAdapter adapter = WebClientAdapter.create(webClient);HttpServiceProxyFactory factory = HttpServiceProxyFactory.builderFor(adapter).build();RepositoryService service = factory.createClient(RepositoryService.class);
1
2
3
4
5
6
7
8
9
public RepositoryService repositoryService () {RestTemplate restTemplate = new RestTemplate ();new DefaultUriBuilderFactory ("https://api.github.com/" ));RestTemplateAdapter adapter = RestTemplateAdapter.create(restTemplate);HttpServiceProxyFactory factory = HttpServiceProxyFactory.builderFor(adapter).build();RepositoryService service = factory.createClient(RepositoryService.class);
然后,我们的接口RepositoryService就注册成spring容器里的一个bean,可以在任何地方注入了。
2.3 HttpExchange的变种 spring官方对@HttpExchange注解,提供了一些扩展,方便使用:
GetExchange
PostExchange
PutExchange
PatchExchange
DeleteExchange
3. 上代码 好了,我们来写一个简单的例子,看看HTTP Interface的使用。
3.1 业务接口 这是我们项目里的业务接口,定义了HTTP Interface的接口定义,通过@GetExchange注解来定义接口
1
2
3
4
5
6
7
8
9
public interface TestApi {@GetExchange(value = "/queryTest",accept = "application/json") test (@RequestParam(value = "pageNum",defaultValue = "1") int pageNum, @RequestParam(value = "pageSize",defaultValue = "10") int pageSize, @RequestParam(value = "jobName",required = false) String jobName ) ;
返回结果会自动封装到TestRes对象中
1
2
3
4
5
6
7
8
9
10
11
12
13
14
15
16
17
18
19
20
21
@Data public class TestBaseRes {private String msg;private Integer code;private Boolean success;@Data public class TestRes extends TestBaseRes {private TestData data;@Data public static class TestData {private Integer total;private JSONArray rows;
3.2 注册代理类 将TestApi配置到代理类中,并指定请求域名:
1
2
3
4
5
6
7
8
9
10
11
@Configuration public class TestConfig {@Bean public TestApi testApi () {RestClient restClient = RestClient.builder().baseUrl("http://localhost:8080/" ).build();RestClientAdapter adapter = RestClientAdapter.create(restClient);HttpServiceProxyFactory factory = HttpServiceProxyFactory.builderFor(adapter).build();return factory.createClient(TestApi.class);
3.3 使用接口 1 2 @Autowired
完整代码可以查看我的github: spring6.x http interface demo
参考